How to use online video coaching to take wickets and score runs
Having announced our new video coaching service today, we thought it would be right to give miCricketCoach readers a look 'under the hood' at how it all works.
This article is a guide to the PitchVision Academy Video Analysis service. We will give you the lowdown on what you need to do to make the most of it.
1. Record your video
Let's be honest, we can't do much until you have a video. So get out your digital camera or camera-phone and get recording yourself batting or bowling.
You don't have to be the next Spielberg, but there are better and worse things to do when you film. The ideal angle for batting is from somewhere near where the umpire stands.
Like this:
It makes it a lot harder to analyse your technique if the angle is to the side or from far away. It's also tricky if the camera is shaking so use someone with a steady hand (or a tripod). So make it easy for you and us by getting your angles right. It's completely optional for you to make your fingers into a frame beforehand, but we find it makes you look like a real pro.
Film yourself playing all the shots (up to 8 including the cut, pull, front and back foot drives).
If you are a bowler there are two angles you need to cover:
- Side on from the open side. Make sure you get in the bound, delivery and start of the follow through.
- Front on. Take care if you are using someone to help you film when taking the front angle. Stay safe and film from behind the net or wicketkeeper.
Once you have your video, put it onto your PC and head to step 2.
2. Send the video to PitchVision Academy
Your perfect video is ready to go (in fact, you can send up to 4 videos that are up to 50mb in size). How do you get it to the coaches for them to do their work?
You upload it using our easy upload tool (it's not only easy, but it's super cool, all the fashionistas want one). Click here to go there now.
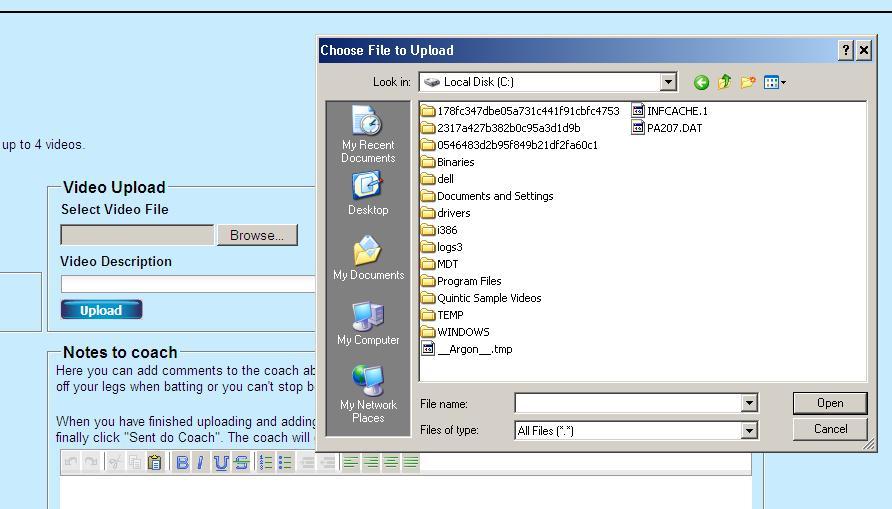
All you need to do to get the video from your PC to the coach is log in and follow the instructions:
- Select "Feedback Type" (batting or bowling).
- Click "Browse" and select the video file on your PC.
- Type a short description in the box "Joe Bloggs Batting Video" for example.
- Click upload
- You can add in your notes once you have uploaded all the videos (You can put anything in here you think might help the coach, such as specific issues you are having or past problems you have solved)
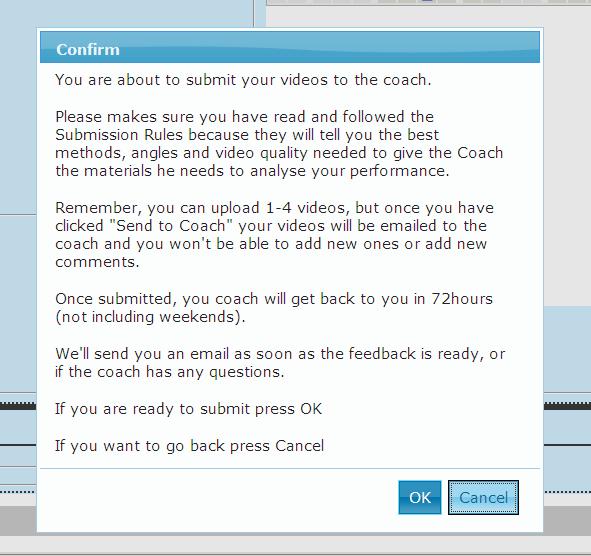
- Once the notes are in, click "I'm Done"
- Double check the notes in the pop-up box, click OK
3. Get back detailed technical analysis and drills
It only takes 72 hours (excluding weekends) for the coach in your speciality area to get back to you. But what will the feedback look like?
Here is a nice screenshot of one of the interactive feedbacks we have prepared earlier:
You can also see the full example lesson on the WattaCoach page on PitchVision Academy.
4. Get in the nets
Now we get to the nuts and bolts. You are armed with all the feedback from your coach but none of it will do any good unless you practice. It's time to head to the nets.
Carefully follow the drills and advice you got from the feedback. Sometimes you can do these things on your own and sometimes you will need to find someone to help you (maybe a batting buddy for the batters).
5. Reap the rewards
Your new technical improvements will lead to runs and wickets if you work hard and follow the instructions from your coach.
To start your video coaching right now, click here.
- Login to post comments


Comments
I am an Offspinner so I took a look at the example lesson and worked on some of the drills and in two days my bowling has look better. I might have to give it a try if I don't win the free one.
Thanks for all the help.
It's great to see we are doing some good Paul, if you do try it then please leave your feedback!